journal home | bluepoof.com
email me
disassembling the forks
Time needed: Give yourself all day if it's your first time pulling forks. That way you can be pleasantly surprised if you don't have to make three trips to Sears for random stuff. This was the third time I've disassembled motorcycle forks and it took considerably less time -- maybe three or four hours altogether.
- Parts:
- New fork oil (the 2001 F650GS takes 601ml per leg for a disassembly; stock is 7.5wt)
- 2 new oil seals
- 2 new dust seals if yours are torn
- Tools:
- 6mm hex wrench
- 10mm socket
- 14mm socket
- small flathead screwdriver
- mallet
- improvised tool: PVC seal driver (see below)
- 8" long piece of 1.75" inner diameter PVC tubing
- hose clamp to fit around PVC tube
- Misc:
- front stand (or some other way of keeping the front end off the ground)
- measuring cup
- plastic cup and a sharpie marker
- large funnel
- container for old fork oil -- I use an empty plastic juice container with screw-on lid
- ruler
- paper towels and shop rags to lay fork innards onto
As you can tell from the parts list above, this is a pretty complicated procedure. It's not really all that hard, though, once you get the hang of it.
background.
There are surprisingly many reasons why someone would want to disassemble forks. For many bikes, it's necessary in order to change the fork oil (thankfully, not for the F650GS; there are drain bolts). Other people pull the forks apart to change the fork seals, to add longer spacers, replace the damper rods, etc.
Unfortunately, I'm disassembling perfectly good forks for a slightly more forboding reason.
As of this writing (November 2008), there have been multiple reports of catastrophic fork failures on the 2001-2002 model F650GS. BMW refuses to officially acknowledge the problem; however, for the 2003 model, the fork lowers were significantly reinforced. There have been no reports of failures from 2003 onwards.
Whether these '01-'02 forks should be subject to a BMW recall is a topic well outside of the scope of this writeup. However, I chose to preemptively replace my fork lowers with the '03+ model. Please note that the part number has not changed, but if you order a fork now, chances are that you'll get the new style.
improvised tool.
Sure, you can pay oodles of money for an official BMW seal driver, but why?
Go to Home Depot and get a piece of 1.75" inner diameter PVC tubing (the outer diameter of the fork is 41mm -- about 1.6"), and about a foot long. Cut a slot in the pipe so that you can stretch or shrink the diameter.
Next, slide a hose clamp over the PVC.

pre-procedure.
Put the bike up on a front stand and remove
the front wheel.

Unbolt the front brake calipers and put them out of the way somewhere. I just loosely zip-tie mine to my engine guard.

Unbolt the fork brace that holds the two forks together.
drain the fork oil.
Use a 6mm hex bit to loosen the pinch bolts on the triple clamp. You don't need to remove these bolts; just loosen them enough so that they turn freely.

Before loosening the lower pinch bolts, pop off the fork caps. I used a small flathead screwdriver to pry mine off.

There's a small circlip underneath the little plug there that you'll need to get out; this is easier with two people.
The first person should push down on the plug -- the business end of a #3 Philips screwdriver works pretty well. This'll expose the circlip, which person #2 can then pop out with a small flathead screwdriver.

Once the circlip is out, you can take out the little plug.

Now go down to the bottom of the forks and set up your fork oil receptacle. Undo the drain bolt (10mm socket) and drain out the old oil.

remove the forks.
Once the oil is drained out, you can remove the forks from the bike. Using a 6mm hex wrench, loosen the pinch bolts on the lower fork brace. Remember your friend Mr. Gravity and hold onto the fork as you loosen the pinch bolts.


disassemble the forks.
Now that the forks are off of your bike, it's time to disassemble them and get the old seals out.
Tip the forks forward and you'll get a spacer, ring, and spring.

The next thing that you have to do is remove the damper rod bolt at the bottom of the fork. This bolt holds the damper rod, which, amongst other things, holds the inner fork tube onto the outer fork tube.
I found the bolt pretty easy to remove with just a 6mm hex wrench and a breaker bar. Have a couple of rags handy since a little more fork oil will probably leak out when you loosen up the bolt.

The bolt itself won't come all the way out (yet), but once it's sufficiently loose, you can tip the forks forward again to retreive your damper rod and its spring.

Next, you're going to remove the dust seal. You can pry this off with a small flathead screwdriver; it's really easy to remove.


Underneath the dust seal, you'll see a metal retainer ring and then the oil seal. You can also use the screwdriver to pry up the retainer ring.


Once the dust seal and retainer rings are removed, you can yank the tubes apart with a few good tugs. You'll probably spray a little more fork oil in the process, so don't wear your prom dress while doing this.

Once the tubes are separated, the oil seal, washer, and bushing will slide right off.

While you have all the fork innards out, inspect them for damage.
This is why you'll probably want to replace the oil seals:

reassemble the forks.
Now that you have the forks taken
apart, it's time to put them back together! Whee!
Make sure to really clean all of the parts before putting them back into the forks. Dust or dirt in the oil can work its way back up through the oil seal, leaving you right back where you started.
Slide the damper rod back into the inner tube. Make sure that the thick rebounding spring is fitted onto it. If, at any point, a short spring fell out of the fork, that goes onto the tapered end of the damper rod.
Make sure that the tapered end of the damper rod falls all the way through the inner tube so that it falls out the other end.


Now go find the damper rod cup and your fork lower. If you can't find your damper rod cup, chances are it's stuck in the bottom of your old fork lower. Thwap it a few times and the cup should fall out.

Slide just the bushing onto the inner tube. Then, tilt the inner tube so that the end of the damper rod sticks out and place the damper rod cup onto it.


Now, go ahead and slide the inner tube into the fork lower. Push that sucker all the way in as far as it'll go.
You'll quickly notice that that isn't very far. That's because the bushing doesn't want to go into the fork lower. Time for Improvised Tool.

Slide the PVC tube over the inner tube and tighten the hose clamp so that the PVC fits just above the bushing. Once it's in place, give the PVC a few really good whacks with a rubber mallet.
We found it most effective to give a couple of whacks, turn the PVC tube 90 degrees, give another few whacks, turn the tube, etc etc.

When you're getting close, pull off the PVC tube and install the washer on top of the bushing.
Put the PVC tube back and whack it a few more times. When the washer is seated, you'll know the bushing is flush and you're done (for now).


Next, slide on the new oil seal. The writing and the shallower groove points up.

Slide the PVC tube over the tube once more and give it just a couple of whacks to seat the oil seal.
As soon as there's enough room on top of the oil seal for the metal retaining ring, fit that into the little gap. It doesn't matter if it can't seat into its groove yet; you just want it to smoosh into the top of the inner tube, above the oil seal, right now.
Put the PVC tube back on and keep whacking. Once you have the oil seal driven down enough so that the retaining ring is seated into its groove in the inner tube, you know that you're done. At this point, you can slide your dust seal on (use the new one now, if you have it). It'll just push right on.

Now it's time to reinsert the damper rod bolt. You should be able to reinsert the bolt and start it with your fingers. Tighten it with a 6mm hex wrench; no need to torque it yet, but it needs to be tight enough so that oil doesn't leak out.
If you're using the same fork lowers that you started with, also double check that the drain bolts are closed tightly.
adding fork oil.
Each fork for the 2001 F650GS takes 610mL of fork oil after reassembly. There's an easy way of measuring this without a lot of drama. Go into the kitchen and get a measuring cup and some sort of receptacle larger than .5 liter (I used an empty Windex bottle).
Pour 610mL of water into the measuring cup, then pour that water into the plastic cup. Take a Sharpie marker and mark the water level on the cup. Pour out the water.


Take your plastic cup out into the garage and fill it to the marker line with new fork oil.

Hold the fork upright and put the funnel into the top. Slowly, pour the new fork oil into the top of the inner tube. Once all of the oil is in, slide the inner tube up and down slowly to really work the new oil into the damper rod.

Carefully drop in the spring, washer, and spacer.

Once all the innards are in place, raise the inner tube up so that it (nearly) covers the spacer.
reinstall the forks.
Carefully slide the fork up into the triple clamp and tighten the top pinch bolt. You don't need to torque it; you're just holding the fork in place for the time being.
Do the same with the lower pinch bolts.
Go find the fork cap plug and circlip. Install the plug and press down again with your #3 Philips while your buddy pops the circlip on top of the plug. Replace the black fork cap.

Loosen up the pinch bolts again (remember your friend Mr. Gravity; be ready to catch the fork). Slide the fork up or down until the distance between the fork cap and top of the triple clamp is 3mm (again, this is for the '01 F650GS -- check the service manual for your particular bike).
Tighten the pinch bolts again when the fork is in place. Torque all of the pinch bolts (uppers and lowers!) to 21 newton-meters.
If you haven't yet, torque the damper rod bolt at the bottom of the forks, also to 21 newton-meters.
Once the forks are back on the bike, replace the fork brace -- the long bolt goes on the rear right (when facing the bike). The cable clip goes on underneath the fork brace onto that long bolt, held on by a 14mm nut.

Replace the front wheel and you're done! Don't forget to pump the front brake a few times once the caliper is reinstalled to make sure that you've got bite.
Incidentally, here in Northern California, most communities have recycling programs that will accept the used fork oil. Every other Thursday, the city comes by for paper/cans/cardboard recycling; if we leave oil out in sealed containers, they'll take it away, too. Definitely recycle the oil if at all possible.
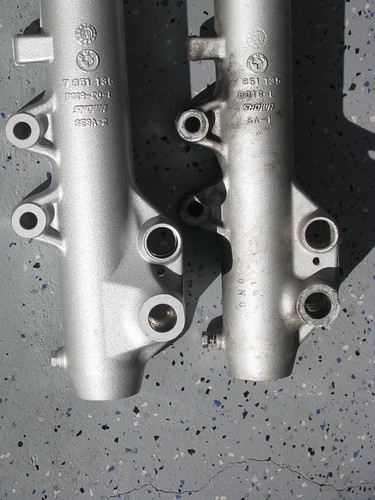
comparison shots.
For the curious, here are some comparison shots between the 2001-2001 fork lowers and the 2003+ models. It's very obvious where BMW has added substantial material around the axle mount.
The dirty ones are my '01 forks. ;)
Right side:
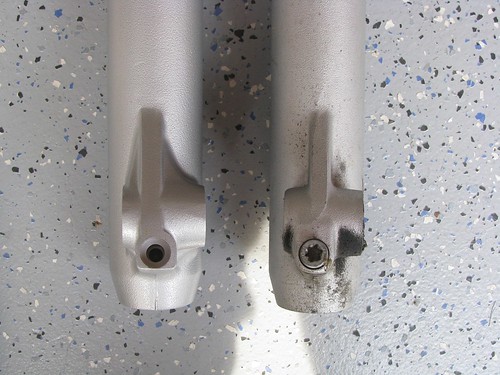

Left side: